

In this tutorial we will show you how to install and configuration of LetsEncrypt SSL with Nginx on your CentOS 6 server. For those of you who didn’t know, LetsEncrypt is a free open certificate authority (CA) that provides free certificates for websites and other services. The service, which is backed by the Electronic Frontier Foundation, Mozilla, Cisco Systems, and Akamai. Unfortunately, LetsEncrypt.org certificates currently have a 3 month lifetime. This means you’ll need to renew your certificate quarterly for now.
This article assumes you have at least basic knowledge of linux, know how to use the shell, and most importantly, you host your site on your own VPS. The installation is quite simple. I will show you through the step by step installation LetsEncrypt SSL in CentOS 6.
How To Install LetsEncrypt SSL With Nginx on CentOS 6
Step 1. First, you need to enable EPEL repository on your system and start by ensuring your system is up-to-date.
# yum install epel-release
# yum -y update
# yum -y install git python-tools python-pip
Step 2. Install LEMP server.
A CentOS 6 LEMP server is required. If you do not have LEMP installed, you can follow our
guide here.
Step 3. Installing LetsEncrypt SSL.
Clone LetsEncrypt git project to your server:
# git clone https://github.com/letsencrypt/letsencrypt
Then change into the project folder:
# cd letsencrypt
Run the commands below to generate a SSL certificate for your website or blogs:
# ./letsencrypt-auto certonly -a standalone -d yourdomain.com -d www.yourdomain.com
Assuming you did everything right, you should see this:
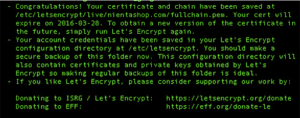
LetsEncrypt puts its keys in this directory /etc/letsencrypt
Step 3. Generating Your SSL Key and CSR.
First create SSL directory to host your SSL certificates.
# mkdir /etc/nginx/ssl
# cd /etc/nginx/ssl
Then follow the steps below to generate a server key, certificate signing request and self-signed certificate. If you want to install a trusted certificate from a trusted certificate authority, then you’ll need to send copy of the CSR to a certificate authority to generate a trusted certificate.
Create the server private key, run the commands below:
# openssl genrsa -des3 -out server.key 2048
Then run the commands below to generate a certificate signing request key using the server private key to create a SSL certificate:
# openssl req -new -key server.key -out server.csr
When you run the above commands, you’ll be prompted to answer few questions. Follow the sample guide below:
- Common Name: The fully-qualified domain name, or URL, you’re securing.
- If you are requesting a Wildcard certificate, add an asterisk (*) to the left of the common name where you want the wildcard, for example *.idroot.net.
- Organization: The legally-registered name for your business. If you are enrolling as an individual, enter the certificate requestor’s name.
- Organization Unit: If applicable, enter the DBA (doing business as) name. If you’re securing a single blog, then type the blog owner’s name here.
- City or Locality: Name of the city where your organization is registered/located.
- State or Province: Name of the state or province where your organization is located.
- Country: The two-letter International Organization for Standardization (ISO) format country code for where your organization is legally registered.
Step 4. Configure the Certificate for Nginx.
You’re ready to install the certificate on Nginx server. Example configuration for Nginx webserver is as followed:
listen 443 ssl spdy;
listen [::]:443 ssl spdy;
ssl on;
ssl_certificate /etc/letsencrypt/live/example.com/fullchain.pem;
ssl_certificate_key /etc/letsencrypt/live/example.com/privkey.pem;
ssl_trusted_certificate /etc/letsencrypt/live/example.com/chain.pem;

ssl_session_cache shared:SSL:10m;
ssl_protocols TLSv1.1 TLSv1.2;
ssl_ciphers 'ECDHE-RSA-AES128-GCM-SHA256:ECDHE-ECDSA-AES128-GCM-SHA256:ECDHE-RSA-AES256-GCM-SHA384:ECDHE-ECDSA-AES256-GCM-SHA384:DHE-RSA-AES128-GCM-SHA256:DHE-DSS-AES128-GCM-SHA256:kEDH+AESGCM:ECDHE-RSA-AES128-SHA256:ECDHE-ECDSA-AES128-SHA256:ECDHE-RSA-AES128-SHA:ECDHE-ECDSA-AES128-SHA:ECDHE-RSA-AES256-SHA384:ECDHE-ECDSA-AES256-SHA384:ECDHE-RSA-AES256-SHA:ECDHE-ECDSA-AES256-SHA:DHE-RSA-AES128-SHA256:DHE-RSA-AES128-SHA:DHE-DSS-AES128-SHA256:DHE-RSA-AES256-SHA256:DHE-DSS-AES256-SHA:DHE-RSA-AES256-SHA:!aNULL:!eNULL:!EXPORT:!DES:!RC4:!3DES:!MD5:!PSK';

ssl_prefer_server_ciphers on;
add_header Strict-Transport-Security max-age=15768000;
ssl_stapling on;
ssl_stapling_verify on;
resolver 8.8.8.8 8.8.4.4 valid=86400;
resolver_timeout 10;
Save your configuration and restart Nginx webserver:
# nginx -t
# service nginx restart
Now your domain should be accessible via HTTPS! Check it out at https://yourdomain.com.
Congratulation’s! You have successfully installed LetsEncrypt SSL. Thanks for using this tutorial for installing LetsEncrypt SSL with Nginx on your CentOS 6 system. For additional help or useful information, we recommend you to check the official LetsEncrypt SSL web site.

Leave a Reply
Want to join the discussion?Feel free to contribute!