Passbolt on CentOS 7 with NGINX / PHP7-FPM / MariaDB from scratch
You tried installing passbolt on CentOS but things didn’t go as planned ? You are struggling with some parts ? Or you simply want to learn how to have a running instance of passbolt ? Then this step by step tutorial is for you. It covers the installation of passbolt on a freshly installed CentOS 7 environment.
You can get CentOS 7 by downloading it from the official mirrors, by running the corresponding AMI for AWS, or by pulling the CentOS docker container.
The goal of this tutorial is not to create an hardened installation, but more to create a minimal barebone passbolt instance you can use to test the application locally, before you start building your production environment.
Before we start, I’d like to point out that SvennD had already made a great tutorial about it. However since then, a few installation steps have evolved and we got to know about a few additional pain points faced by the community while installing passbolt on CentOS, hence this updated version was born.
This tutorial was made for passbolt v1.6.9
Base packages
Let’s first update our yum database and enable EPEL repositories to install all the required passbolt components:
Entropy is required to generate the SSL or GPG keys. Since it can be long to generate entropy (e.g. randomness) on virtual machines we will install rng-tools to ensure that there is enough.
Security note: rng-tools is not magic, as it can only get entropy from the sources available. In other words if your virtual machine has no available sources of entropy then security-wise it will not help. You can check how much entropy is available at any given time, the higher the better. Learn more.
We will be making use of the default nginx user to run both nginx and php-fpm. FPM out of the box uses the apache user but it is easy to change:
Edit /etc/php-fpm.d/www.conf with your preferred editor and modify the user/group configuration parameter to ‘nginx’:user = nginxgroup = nginx
Some users have found errors regarding the strtotime() in passbolt log files. If that is your case you can set the timezone in /etc/php.ini like following:
date.timezone = Asia/Kuala_Lumpur
MariaDB
We will use mariadb here, but you could also use mysql. In this section we will:
Install mariadb engine
Set up the root user credentials for mariadb using
# mysql_secure_installation
Create a database called ‘passbolt’ for Passbolt to operate with.
Grant permissions on database ‘passbolt’ to user ‘passbolt’
Let’s install mariadb server
# yum install mariadb-server
Start the mariadb server and enable the service to start on the next boot:
It’s not mandatory but recommended to run the following command to secure initial mariadb installations. We will use it in this tutorial to set the root credentials for the mariadb instance.
It will help you to set the root credentials and more, just:
# mysql_secure_installation
Check the official mariadb documentation to learn more.
Create a database with a name that suits your organization, for this case we will be original and name it ‘passbolt’:
# mysqladmin -u root -p create passbolt
If you have used the mysql_secure_installation you have probably set a root password for the mariadb instance. Use that password and the root user to connect as root to the mariadb console and grant permissions for the passbolt database to a user called passbolt with a password of your choice:
# mysql -u root -p -e "GRANT ALL ON passbolt.* to passbolt@'localhost' identified by 'YOUR_SECRET_PASSWORD_OF_CHOICE';"
Note the user will be only allowed to connect to the database through localhost. If plan to install mariadb on a remote node this value might change.
Passbolt setup
Now that we have all the required dependencies and packages installed, let’s start configuring passbolt and its dependencies.
Generate GPG key pair
Important: Currently php-gnupg does not support keys with a passphrase so you will need to leave that field empty.
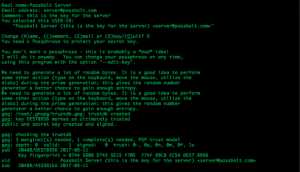
Passbolt will need its own PGP key to be able to shake hands with the users during the authentication procedure. Use the command below to generate a PGP key pair, and answer the questions.
It’s a good idea to fill in the details properly and not press enter frantically. Make sure you have decent name and email for the key. This will come in handy to identify and verify it down the line.
Important: Currently php-gnupg does not support keys with a passphrase so you will need to leave that field empty.
# gpg --gen-key
Download passbolt source code
Download the source code from its git repository and store it in /var/www/passbolt
The web server needs to be able to write in the tmp directory to speed things up during excecution. It also need a place to upload the profile pictures.
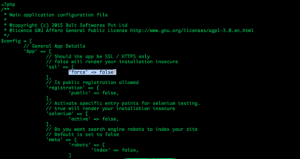
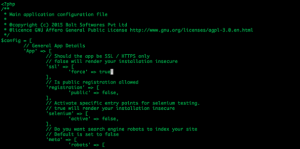
We need to edit the security salt, cipherSeed (digit only), and fullBaseUrl (the url where passbolt will be reachable) in core.php. Both values are currently not used, but they may be used in the future, so it is a mandatory step. Choose random values by for example throwing a few dice.
We also want to uncomment and change the App.fullBaseUrl to our selected domain or ip address so that all the links are correctly formatted. This will be used for example to display the avatar images in the notification emails.
Do not forget to uncomment the line. It is commented by default!
5.3. We also need to set the right database name and user credentials in database.php.
# vim database.php
You need to fill in the details for your default database server. Here mostly login (e.g. root or whatever user you have created previously), password and database (passbolt).
We need to tell the application to use reuse our freshly created gpg keys, as the default ones are insecure. To accomplish this we set the fingerprint and location in app.php (in the GPG Configuration section). Also take a moment to check the other application settings. You may want to allow public registration of users for example.
To obtain the fingerprint of your key, you can run the command below.
# echo `gpg –fingerprint passboltserver@passbolt.com | sed -n ‘2p’ | rev | awk ‘{NF=10}1’ | rev | sed ‘s/ //g’`
Configure the GPG Keyring for the nginx user
5.1 Retrieve the home directory of the nginx user, this is where the GPG keyring will be stored and used by nginx server. We are in CentOS 7, so the default location should be /var/lib/nginx
# getent passwd nginx
nginx:x:997:995:Nginx web server:/var/lib/nginx:/sbin/nologin
5.2 Create the .gnupg keyring directory by, for instance, listing the current gpg keys (which should be none)
# su -c “gpg –list-keys” -s /bin/bash nginx
5.3. Edit /var/www/passbolt/app/Config/app.php to use the newly created keyring. The only thing we’ll need to edit is the GPG.env.home entry, and set it with the path of the .gnupg directory (in centos 7: /var/lib/nginx/.gnupg)
‘home’ => ‘/var/lib/nginx/.gnupg’,
Wrapping up
Install passbolt
Everything is now ready. We can install passbolt.
# cd /var/www/passbolt
# su -s /bin/bash -c "app/Console/cake install --no-admin" nginx
You can at that step decide if you want to send anonymous statistics about your passbolt usage. Cool kids do, because it helps the developers to make passbolt better for everyone.
Configure Nginx
Passbolt is installed. We now need to tell nginx how to run it. Among other settings, passbolt needs to be run by a web server configured with url rewriting.
# vim /etc/nginx/conf.d/default.conf
Below is an example of configuration you can use in
We’ll also set App.ssl.force parameter to false in the app.php configuration file, so that we can test that passbolt is already in a working condition. If we keep it to true, passbolt would not let us access it through http and would force https.
# vim /var/www/passbolt/app/Config/app.php
4. Selinux permissions
Disable selinux
5. Check that everything is in order
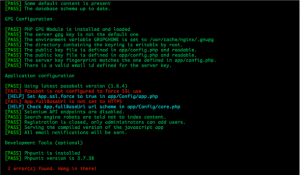
Everything is now in a working condition. We’ll execute the healthcheck command to get a full report about the passbolt installation
# su -c "/var/www/passbolt/app/Console/cake passbolt healthcheck" -s /bin/bash nginx
In our installation, everything seems now in order, except the SSL part which we are going to fix.
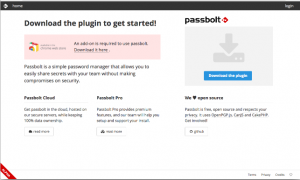
We can also see that passbolt is now accessible through a web browser:
If you are impatient to see passbolt in action, continue with the next step: create a first user. Or if you want to complete everything first, then you can jump directly to the emails section.
Create the first user
At last, passbolt is up and running! But there is no user yer. So let’s create our first user, the administrator.
# su -c "/var/www/passbolt/app/Console/cake passbolt register_user -u admin@passbolt.dev -f ada -l lovelace -r admin" -s /bin/bash nginx
Follow the link in the terminal to start the setup process, in the browser, for this admin user. Once logged in, we can start creating passwords.
Don’t forget to take a backup of your key during the setup.
Going further
Emails
Before inviting other users we need to wrap-up the email configuration in app/Config/email.php. Enter the host, username and password of your SMTP server in the default configuration.
It is recommended to use https with passbolt (and, well, pretty much everything). To setup SSL we need a certificate. Here for the sake of brevity we will create a self-signed certificate. Of course you are free to use a proper free certificate and tidy up the server supported cypher suites.
In the following steps, we’ll generate a self signed certificate and configure nginx and passbolt to use https.
server {
 listen 443;
 server_name yourdomain.com;
 ssl on;
 ssl_certificate     /etc/ssl/certs/passbolt.crt;
 ssl_certificate_key /etc/ssl/certs/passbolt.key;
 ssl_protocols TLSv1.2;
 ssl_prefer_server_ciphers on;
 ssl_ciphers ECDH+AESGCM:DH+AESGCM:ECDH+AES256:DH+AES256:ECDH+AES128:DH+AES:ECDH+3DES:DH+3DES:RSA+AESGCM:RSA+AES:RSA+3DES:!aNULL:!MD5:!DSS;
 ssl_session_tickets off;
 root /var/www/passbolt;
# X-Frame-Options is to prevent from clickJacking attack
 add_header X-Frame-Options SAMEORIGIN;
#  disable content-type sniffing on some browsers.
 add_header X-Content-Type-Options nosniff;
# This header enables the Cross-site scripting (XSS) filter
 add_header X-XSS-Protection "1; mode=block";
# This will enforce HTTP browsing into HTTPS and avoid ssl stripping attack
 add_header Strict-Transport-Security "max-age=31536000; includeSubdomains;";
location / {
   try_files $uri $uri/ /index.php?$args;
   index index.php;
 }
location ~ .php$ {
   fastcgi_index           index.php;
   fastcgi_pass            127.0.0.1:9000;
   fastcgi_split_path_info ^(.+.php)(.+)$;
   include                 fastcgi_params;
   fastcgi_param           SCRIPT_FILENAME $document_root$fastcgi_script_name;
   fastcgi_param           SERVER_NAME $http_host;
 }
location ~* .(jpe?g|woff|woff2|ttf|gif|png|bmp|ico|css|js|json|pdf|zip|htm|html|docx?|xlsx?|pptx?|txt|wav|swf|svg|avi|mpd)$ {
   access_log off;
   log_not_found off;
   try_files $uri /app/webroot/$uri /index.php?$args;
 }
}
2.4 Reload configuration
# systemctl restart nginx
We’ll need to change the passbolt configuration to make him use https instead of http, and force the redirection to https:
# vim /var/www/passbolt/app/Config/app.php
2.5. Set App.ssl.force to true
# vim /var/www/passbolt/app/Config/core.php
2.5. Set App.fullBaseUrl to https
url change to https
That’s it! Passbolt is now ready to be used with https.
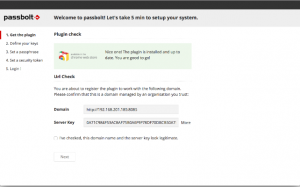
You will notice that the passbolt plugin tells you that the plugin is not configured to work with this domain. This is normal since it was already configured to work with http, and not https.
That’s not an issue, you can fix this easily by clicking on “recover an existing account”
Self Signed Cert
1. Create a new openssl.cnf /etc/pki/tls/
[req]
req_extensions = v3_req
distinguished_name = passbolt.xxx.com
prompt = no
[ passbolt.xxx.com ]
C = KL
O = KL
CN = passbolt.xxx.com
[ v3_req ]
# Extensions to add to a certificate request
basicConstraints = CA:FALSE
keyUsage = nonRepudiation, digitalSignature, keyEncipherment
subjectAltName = @alt_names
[alt_names]
IP.1 = 167.99.XXX.XXX
DNS.1 = passbolt.xxx.com
We may request cookies to be set on your device. We use cookies to let us know when you visit our websites, how you interact with us, to enrich your user experience, and to customize your relationship with our website.
Click on the different category headings to find out more. You can also change some of your preferences. Note that blocking some types of cookies may impact your experience on our websites and the services we are able to offer.
Essential Website Cookies
These cookies are strictly necessary to provide you with services available through our website and to use some of its features.
Because these cookies are strictly necessary to deliver the website, you cannot refuse them without impacting how our site functions. You can block or delete them by changing your browser settings and force blocking all cookies on this website.
Other external services
We also use different external services like Google Webfonts, Google Maps and external Video providers. Since these providers may collect personal data like your IP address we allow you to block them here. Please be aware that this might heavily reduce the functionality and appearance of our site. Changes will take effect once you reload the page.
Google Webfont Settings:
Google Map Settings:
Vimeo and Youtube video embeds:
Privacy Policy
You can read about our cookies and privacy settings in detail on our Privacy Policy Page.


Leave a Reply
Want to join the discussion?Feel free to contribute!