
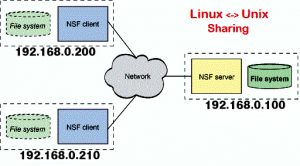
NFS Server (192.168.0.100)
Step 1: Install nfs server
yum install nfs-utils nfs-utils-lib
Step 2: allow web server mount file
vim /etc/exports
/web 192.168.0.200(rw,sync,anonuid=520,anongid=520)
/web 192.168.0.210(rw,sync,anonuid=520,anongid=520)
ro: The directory is shared read only; the client machine will not be able to write it. This is the default.
rw: The client machine will have read and write access to the directory.
root_squash: Prevents root users connected remotely from having root privileges and assigns them the user ID for the user nfsnobody. This effectively "squashes" the power of the remote root user to the lowest local user, preventing unauthorized alteration of files on the remote server. Alternatively, the no_root_squash option turns off root squashing. To squash every remote user, including root, use the all_squash option. To specify the user and group IDs to use with remote users from a particular host, use the anonuid and anongid options, respectively. In this case, a special user account can be created for remote NFS users to share and specify (anonuid=,anongid=), where  is the user ID number and  is the group ID number.
no_root_squash: By default, any file request made by user root on the client machine is treated as if it is made by user nobody on the server. (Exactly which UID the request is mapped to depends on the UID of user "nobody" on the server, not the client.) If no_root_squash is selected, then root on the client machine will have the same level of access to the files on the system as root on the server. This can have serious security implications, although it may be necessary if you want to perform any administrative work on the client machine that involves the exported directories. You should not specify this option without a good reason.
no_subtree_check: If only part of a volume is exported, a routine called subtree checking verifies that a file that is requested from the client is in the appropriate part of the volume. If the entire volume is exported, disabling this check will speed up transfers.
sync: By default, all but the most recent version (version 1.11) of the exportfs command will use async behavior, telling a client machine that a file write is complete - that is, has been written to stable storage - when NFS has finished handing the write over to the filesystem. This behavior may cause data corruption if the server reboots, and the sync option prevents this. See Section 5, “Optimizing NFS Performance” for a complete discussion of sync and async behavior.
Step 3: web file put in /web
mkdir /web
NFS Client (192.168.0.200)
Step 1: Install nfs client
yum install nfs-utils nfs-utils-lib
Step 2: create web file
mkdir /mnt/web
Step 3: Auto Mount
vim /etc/fstab
192.168.0.100:/web      /mnt/web/        nfs defaults 0 0
Step 4: Nginx upstream to NFS server file
server {
listen 80;
server_name     www.nfstest.com;
root /mnt/web;
index index.jhtml index.html index.htm;
charset utf-8;
access_log logs/web.access.log ;
error_log logs/web.error.log ;

error_page 404 404.jsp;
error_page 500 502 503 500.jsp;
}
NFS Client (192.168.0.210)
Step 1: Install nfs client
yum install nfs-utils nfs-utils-lib
Step 2: create web file
mkdir /mnt/web
Step 3: Auto Mount
vim /etc/fstab
192.168.0.100:/web      /mnt/web/        nfs defaults 0 0
Step 4: Nginx upstream to NFS server file
server {
listen 80;
server_name     www.nfstest.com;
root /mnt/web;
index index.jhtml index.html index.htm;
charset utf-8;
access_log logs/web.access.log ;
error_log logs/web.error.log ;

error_page 404 404.jsp;
error_page 500 502 503 500.jsp;
}


Leave a Reply
Want to join the discussion?Feel free to contribute!