
Step 1 : Installing powerdns
apt-get update
apt-get dist-upgrade -y
apt-get install mysql-server
**keyin your mysql root password**
apt-get install pdns-server pdns-backend-mysql
**keyin a password,it could same with root password, but better not**
Step 2 : Configure powerdns
cd /etc/powerdns/pdns.conf
#Insert at the end of file
webserver=no
webserver-port= daemon=yes
disable-axfr=yes
guardian=yes
local-address=1.2.3.4 (your server ip)
local-port=53
recursor=127.0.0.1:53
cd /etc/powerdns/pdns.d
vim /etc/powerdns/pdns.d/pdns.local.gmysql.conf
**keyin the mysql port**
gmysql-port=3306
Restart powerdns
service pdns restart
service pdns status (check any error)
dig @localhost
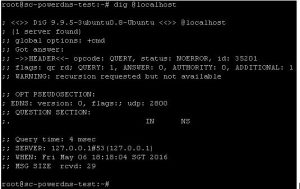
check the result , if same, PowerDNS DNS server is already running and ready to use.
service pdns stop
Step 3 : install pdns-recursor
apt-get install pdns-recursor
Step 4 : Configure pdns-recursor
cd /etc/powerdns/
vim recursor.conf
**delete all & insert**
dont-query=
local-address=127.0.0.1,
local-port=53
quiet=yes
setgid=pdns
setuid=pdns
#version-string="GNS DNS Version 4.0.0"
non-local-bind=yes
daemon=true
Start all powerdns service
service pdns start
service pdns-recursor start
Change your pc’s dns to your dns server ip address, nslookup your domain set just now.
Enjoy !

Leave a Reply
Want to join the discussion?Feel free to contribute!