
How to Install HAProxy Load Balancer on CentOS
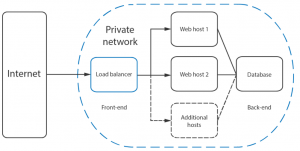
Load balancing is a common solution for distributing web applications horizontally across multiple hosts while providing the users with a single point of access to the service. HAProxyis one of the most popular open source load balancing software, which also offers high availability and proxy functionality.
HAProxy aims to optimise resource usage, maximise throughput, minimise response time, and avoid overloading any single resource. It is available for install on many Linux distributions like CentOS 7 in this guide, but also on Debian 8 and Ubuntu 16 systems.
HAProxy is particularly suited for very high traffic websites and is therefore often used to improve web service reliability and performance for multi-server configurations. This guide lays out the steps for setting up HAProxy as a load balancer on CentOS 7 to its own cloud host which then directs the traffic to your web servers.
As a pre-requirement for the best results, you should have a minimum of two web servers and a server for the load balancer. The web servers need to be running at least the basic web service such as nginx or httpd to test out the load balancing between them.
Installing HAProxy CentOS 7
As a fast developing open source application HAProxy available for install in the CentOS default repositories might not be the latest release. To find out what version number is being offered through the official channels enter the following command.
sudo yum info haproxy
HAProxy has always three active stable versions of the releases, two of the latest versions in development plus a third older version that is still receiving critical updates. You can always check the currently newest stable version listed on the HAProxy website and then decide which version you wish to go with.
In this guide, we will be installing the currently latest stable version of 1.7, which was not yet available in the standard repositories. Instead, you will need to install it from the source. But first, check that you have the prerequisites to download and compile the program.
sudo yum install gcc pcre-static pcre-devel -y
Download the source code with the command below. You can check if there is a newer version available at the HAProxy download page.
cd /opt
wget https://www.haproxy.org/download/1.7/src/haproxy-1.7.8.tar.gz
Once the download is complete, extract the files using the command below.
tar xzvf haproxy-1.7.8.tar.gz
Change into the extracted source directory.
cd /opt/haproxy-1.7.8
Then compile the program for your system.
vim /Makefile
make TARGET=linux2628
And finally, install HAProxy itself.
sudo make install
With that done, HAProxy is now installed but requires some additional steps to get it operational. Continue below with setting up the software and services.
Setting up HAProxy for your server
Next, add the following directories and the statistics file for HAProxy records.
sudo mkdir -p /etc/haproxy
sudo mkdir -p /var/lib/haproxy
sudo touch /var/lib/haproxy/stats
Create a symbolic link for the binary to allow you to run HAProxy commands as a normal user.
sudo ln -s /usr/local/sbin/haproxy /usr/sbin/haproxy
If you want to add the proxy as a service to the system, copy the haproxy.init file from the examples to your /etc/init.d directory. Change the file permissions to make the script executable and then reload the systemd daemon.
sudo cp ~/haproxy-1.7.8/examples/haproxy.init /etc/init.d/haproxy
sudo chmod 755 /etc/init.d/haproxy
sudo systemctl daemon-reload
You will also need to enable the service to allow it to restart automatically at system boot up.
sudo systemctl enable haproxy
For general usage, it is also recommended to add a new user for HAProxy to be run under.
sudo useradd -r haproxy
Afterwards, you can double check the installed version number with the following command.
haproxy -v

HA-Proxy version 1.7.8 2017/07/07
Copyright 2000-2017 Willy Tarreau
In this case, the version should be 1.7.8 like shown in the example output above.
Lastly, the firewall on CentOS 7 is quite restrictive for this project by default. Use the following commands to allow the required services and reload the firewall.
sudo firewall-cmd --permanent --zone=public --add-service=http
sudo firewall-cmd --reload
Configuring the load balancer
Setting up HAProxy for load balancing is a quite straight forward process. Basically, all you need to do is tell HAProxy what kind of connections it should be listening for and where the connections should be relayed to.
This is done by creating a configuration file /etc/haproxy/haproxy.cfg with the defining settings. You can read about the configuration options at HAProxy documentation page if you wish to find out more.
Load balancing at layer 4
Start off with a basic setup. Create a new configuration file, for example, using vi with the command underneath.
sudo vi /etc/haproxy/haproxy.cfg
Add the following sections to the file. Replace the with what ever you want to call you servers on the statistics page and the with the private IPs for the servers you wish to direct the web traffic to. You can check the private IPs at your UpCloud Control Panel and Private network tab under Network menu.
global
   log /dev/log local0
   log /dev/log local1 notice
   chroot /var/lib/haproxy
   stats timeout 30s
   user haproxy
   group haproxy
   daemon

defaults
   log global
   mode http
   option httplog
   option dontlognull
   timeout connect 5000
   timeout client 50000
   timeout server 50000

frontend http_front
   bind *:80
   stats uri /haproxy?stats
   default_backend http_back
   mode http
   option forwardfor   # forward IP
   http-request set-header X-Forwarded-Port % [dst_port]   # forward port

################################################################################################
backend http_back
   balance leastconn # leastconn is check which server not busy then use the backend server
   cookie SERVERID insert indirect nocache
   server  web100 192.168.0.100:80 check inter 2000 cookie w1 # cookie w1 is can check on browser what is ur backend
   server  web200 192.168.0.200:80 check inter 2000 cookie w2 # cookie w1 is can check on browser what is ur backend
   timeout connect 900000
   timeout server 900000

backend http_back
   balance roundrobin # roundrobin is rotate customers into backend server
   server web100 192.168.0.100:80 check inter 2000 cookie w1
   server web200 192.168.0.200:80 check inter 2000 cookie w2
   timeout connect 900000
   timeout server 900000
This defines a layer 4 load balancer with a front-end name http_front listening to the port number 80, which then directs the traffic to the default backend named http_back. The additional stats URI /haproxy?stats enables the statistics page at that specified address.
Start the load balancer service
systemctl start haproxy


Leave a Reply
Want to join the discussion?Feel free to contribute!