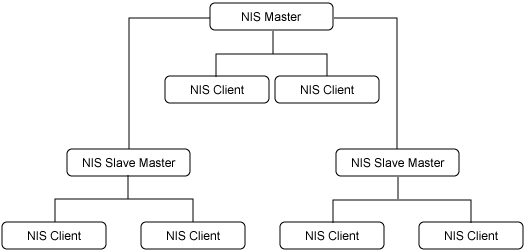
Introduction to NIS
The Network Information Service (NIS) provides a simple network lookup service consisting of databases and processes. It was formerly known as Sun Yellow Pages (YP). The functionality of the two remains the same; only the name has changed. Its purpose is to provide information, that has to be known throughout the network, to all machines on the network. Information likely to be distributed by NIS is:
login names/passwords/home directories (/etc/passwd)
group information (/etc/group)
host names and IP numbers (/etc/hosts)
In this article we had shell scripts ready for all the user easy and fast to install NIS server and NIS client on the Machines.
Thing you need:
2x Centos7 Server
192.168.0.9 NIS SERVER
192.168.0.7 NIS CLIENT
Step1:
Copy below content and changes all the red text based on your server setting.
#!/bin/sh

#changes your own variable at the red text

maindomain=linuxscriptshub.com
securenet=192.168.0.0
netmask=255.255.255.0
mainserverip=192.168.0.9
mainserverdomain=main.linuxscriptshub.com
mainserversub=main

clientserverip=192.168.0.7
clientserverdomain=client.linuxscriptshub.com
clientserversub=client


yum -y install ypserv rpcbind

ypdomainname $maindomain
echo "NISDOMAIN=$maindomain" >> /etc/sysconfig/network

cat > /var/yp/securenets << securenet 255.0.0.0 127.0.0.0 $netmask $securenet securenet echo "$mainserverip $mainserverdomain $mainserversub" >> /etc/hosts
echo "$clientserverip $clientserverdomain $clientserversub" >> /etc/hosts
echo "$mainserverip $maindomain" >> /etc/hosts

systemctl start rpcbind ypserv ypxfrd yppasswdd

systemctl enable rpcbind ypserv ypxfrd yppasswdd

/usr/lib64/yp/ypinit -m

cd /var/yp

make

echo "YPSERV_ARGS="-p 944"" >> /etc/sysconfig/network
echo "YPXFRD_ARGS="-p 945"" >> /etc/sysconfig/network

sed -i 's/YPPASSWDD_ARGS=/YPPASSWDD_ARGS="--port 946"/g' /etc/sysconfig/yppasswdd

systemctl restart rpcbind ypserv ypxfrd yppasswdd

firewall-cmd --add-service=rpc-bind --permanent
firewall-cmd --add-port=944/tcp --permanent
firewall-cmd --add-port=944/udp --permanent
firewall-cmd --add-port=945/tcp --permanent
firewall-cmd --add-port=945/udp --permanent
firewall-cmd --add-port=946/udp --permanent
firewall-cmd --reload
Save all these after you changes your viriable to NIS_server.sh
Step2: Run the NIS_server.sh with below command
Note: you must have root permission on your user. Run the scripts with below command.
sudo ./NIS_server.sh
That would be all on the Server side, you can check the status of NIS with below command:
systemctl status pcbind ypserv ypxfrd yppasswdd
Client NIS 192.168.0.7
Step1:
Copy below content and changes all the red text based on your server setting.
#!/bin/sh

maindomain=linuxscriptshub.com
mainserverip=192.168.0.9
mainserverdomain=main.linuxscriptshub.com
mainserversub=main

clientserverip=192.168.0.7
clientserverdomain=client.linuxscriptshub.com
clientserversub=client

yum -y install ypbind rpcbind
ypdomainname $maindomain
echo "NISDOMAIN=$maindomain" >> /etc/sysconfig/network
echo "$mainserverip $mainserverdomain $mainserversub" >> /etc/hosts
echo "$clientserverip $clientserverdomain $clientserversub" >> /etc/hosts
echo "$mainserverip $maindomain" >> /etc/hosts

authconfig --enablenis --nisdomain=$maindomain --nisserver=mainserverdomain --enablemkhomedir --update
systemctl start rpcbind ypbind
systemctl enable rpcbind ypbind

firewall-cmd --add-service=rpc-bind --permanent
firewall-cmd --add-port=944/tcp --permanent
firewall-cmd --add-port=944/udp --permanent
firewall-cmd --add-port=945/tcp --permanent
firewall-cmd --add-port=945/udp --permanent
firewall-cmd --add-port=946/udp --permanent
firewall-cmd --reload
Save all these after you changes your variable to NIS_client.sh
Step2: Run the NIS_server.sh with below command
Note: you must have root permission on your user. Run the scripts with below command.
sudo ./NIS_client.sh
Congratulation you have install your first client on 192.168.0.7
We still have one scripts to automate the useradd process and update the NIS databases.
The below scripts are to perform in the server side. 192.168.0.9
USERADD
#!/bin/sh
echo "Please enter the username you want to add."
read user

useradd $user
passwd $user

cd /var/yp
make
Save upper content to a scripts name adduser_nis.sh
Step: Run the adduser_nis.sh with below command
Note: you must have root permission on your user. Run the scripts with below command.
sudo ./adduser_nis.sh
After enter the username and passowrd.
Congratulation, you have add the first user on the server side, you may now using the username and try to login from the client.


Leave a Reply
Want to join the discussion?Feel free to contribute!