

Before you start , we are assume you have the basic knowledge of Linux Centos 7.
Note: This article are not tide with security, it just a basic setup for wordpress in Centos 7
Anyways we are going to show you how to install Lamp stack for wordpress right now.
STEP1: Disable Selinux
vi /etc/sysconfig/selinux
SELINUX=enforcing
Changes to
SELINUX=disabled
After done setting disabled for selinux, reboot your server with below command.
reboot
Step 2: Install mysql-server on Centos 7
sudo yum update

sudo yum install wget

wget http://repo.mysql.com/mysql-community-release-el7-5.noarch.rpm

sudo rpm -ivh mysql-community-release-el7-5.noarch.rpm

yum update

sudo yum install mysql-server

sudo systemctl start mysqld
Make sure that mysql is running with below command.
netstat -ntulp
you will see something result like below.
Active Internet connections (only servers)
Proto Recv-Q Send-Q Local Address Foreign Address State PID/Program name
tcp 0 0 0.0.0.0:22 0.0.0.0:* LISTEN 3169/sshd
tcp 0 0 127.0.0.1:25 0.0.0.0:* LISTEN 1269/master
tcp6 0 0 :::3306 :::* LISTEN 21869/mysqld
Enable for auto startup mysql when you fire up your machines.
systemctl enable mysqld
Step2: Configure your mysql server
Set passwords for the MySQL root account:
mysql_secure_installation
NOTE: RUNNING ALL PARTS OF THIS SCRIPT IS RECOMMENDED FOR ALL MySQL
SERVERS IN PRODUCTION USE! PLEASE READ EACH STEP CAREFULLY!
In order to log into MySQL to secure it, we’ll need the current
password for the root user. If you’ve just installed MySQL, and
you haven’t set the root password yet, the password will be blank,
so you should just press enter here.
Enter current password for root (enter for none):
OK, successfully used password, moving on...
Setting the root password ensures that nobody can log into the MySQL
root user without the proper authorisation.
Set root password? [Y/n] <-- ENTER
New password: <-- yourrootsqlpassword
Re-enter new password: <-- yourrootsqlpassword
Password updated successfully!
Reloading privilege tables..
... Success!
By default, a MySQL installation has an anonymous user, allowing anyone
to log into MySQL without having to have a user account created for
them. This is intended only for testing, and to make the installation
go a bit smoother. You should remove them before moving into a
production environment.
Remove anonymous users? [Y/n] <-- ENTER
... Success!
Normally, root should only be allowed to connect from ‘localhost’. This
ensures that someone cannot guess at the root password from the network.
Disallow root login remotely? [Y/n] <-- ENTER
... Success!
By default, MySQL comes with a database named ‘test’ that anyone can
access. This is also intended only for testing, and should be removed
before moving into a production environment.
Remove test database and access to it? [Y/n] <-- ENTER
- Dropping test database...
... Success!


- Removing privileges on test database...
... Success!
Reloading the privilege tables will ensure that all changes made so far
will take effect immediately.
Reload privilege tables now? [Y/n] <-- ENTER
... Success!
Cleaning up...
All done! If you’ve completed all of the above steps, your MySQL
installation should now be secure.
Thanks for using MySQL!
Step 3: Install web server (HTTPD)
yum install httpd -y

systemctl enable httpd

systemctl start httpd
use below command to verify that your web server is on.
netstat -ntulp |grep 80
You will get something result similar to this.
tcp6 0 0 :::80 :::* LISTEN 22011/httpd
Now direct your browser to http://your_ip_address, and you should see the Apache2 placeholder page:
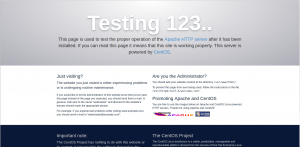
if you cant get this page, please make sure you have allow port 80 in your iptables.
otherwise please run below command to flush the default iptables rules.
iptables -F
and try again with your ip address on web browser.
If still cant open please make sure you have really disabled the selinux, you can confirm with below command
getenforce
you should see something that like this
Disabled
Step 4 : Install php
yum -y install php
We must restart Apache afterwards:
systemctl restart httpd
5 Testing PHP5 / Getting Details About Your PHP5 Installation
The document root of the default web site is /var/www/html. We will now create a small PHP file (info.php) in that directory and call it in a browser. The file will display lots of useful details about our PHP installation, such as the installed PHP version.
vi /var/www/html/info.php
<?php
phpinfo();
?>
Now we call that file in a browser (e.g. http://your_ipaddress/info.php):
Step 5: Getting MySQL Support In PHP
To get MySQL support in PHP, we can install the php-mysql package.
yum -y install php-mysql
In the next step I will install some common PHP modules that are required by CMS Systems like WordPress, Joomla and Drupal:
yum -y install php-gd php-imap php-ldap php-odbc php-pear php-xml php-xmlrpc php-mbstring php-mcrypt php-mssql php-snmp php-soap php-tidy curl curl-devel
Now restart httpd:
systemctl restart httpd
Since we are already install lamp stack on top, we will now go through start by wordpress.
Step One – Downloading WordPress
yum install wget
As first step in the process, you must download WordPress from the website by using the wget command:
wget http://wordpress.org/latest.tar.gz
The above command shall help you download the zipped WordPress package straightaway to the home directory of the user. You may unzip g command:
tar -xzvf latest.tar.gz
The above command shall lead to unzipping of the downloaded WordPress files, and you are now ready to move on to Step 2.
Step Two – Creating the WordPress Database and User
After you have managed to unzip the WordPress files, you will find them in a directory called WordPress within the home directory.
Subsequently, you need to create a new MySQL directory for WordPress. For that, you need to log into the MySQL Shell using the following command:
mysql -u root -p
You must login here through your MySQL root password, and further create the following:
1. A WordPress Database
2. A User in the created database
Subsequently, you would be required to assign new password. Here, it is important to remember that the whole lot of MySQL commands must certainly end with a semi-colon (;)
First of all, you need to create the database, which has been named as linuxscriptshub for the purpose of this tutorial, though users are free to name the actual database as per their liking.
Please use the following command to create the database:
mysql> CREATE DATABASE linuxscriptshub;
Query OK, 1 row affected (0.00 sec)
Next, you are required to create the new user. You may replace the database, name, and password values given below with values as per your preference:
mysql> create user linuxuser@localhost;
Query OK, 0 rows affected (0.01 sec)
mysql> create user linuxuser@127.0.0.1;
Query OK, 0 rows affected (0.00 sec)
Once the user has been created, you need to set the password for the new user by using the following command:
mysql> set password for linuxuser@localhost= PASSWORD("linuxscipts123");
Query OK, 0 rows affected (0.00 sec)
mysql> set password for linuxuser@127.0.0.1= PASSWORD("linuxscipts123");
Query OK, 0 rows affected (0.00 sec)
You must round up this step by granting all privileges to the newly created user. Please note that if you miss this step, you would not be able to start the WordPress installer. Please use the following command to do the same:
mysql> Grant all privileges on linuxscriptshub.* to linuxuser@localhost  IDENTIFIED BY 'linuxscripts123';
Query OK, 0 rows affected (0.01 sec)

mysql> Grant all privileges on linuxscriptshub.* to linuxuser@127.0.0.1 IDENTIFIED BY 'linuxscripts123';
Query OK, 0 rows affected (0.01 sec)
Subsequently, you need to refresh MySQL using the following command:
mysql> FLUSH PRIVILEGES;
Query OK, 0 rows affected (0.00 sec)
Once done with the above steps, its now time to exit out of the MySQL shell by giving the following command:
mysql> exit
Bye
Step Three – Setting up the Configuration of WordPress
First you need to copy the sample WordPress configuration file, which is located in the WordPress directory, into an altogether new file which would need to be edited, thus creating a new and usable WordPress config. Please use the following command to execute the same:
cp wordpress/wp-config-sample.php wordpress/wp-config.php
Further, you need to open the wordpress configuration by keying in the following command:
vi wordpress/wp-config.php
You need to search for the section containing the fields given below, and replace with precise details for your database name, username, and password:
MySQL settings – You can get this info from your web host
/** The name of the database for WordPress */ define(‘DB_NAME’, ‘linuxscriptshub‘);
/** MySQL database1 username1 */ define(‘DB_USER’, ‘linuxuser‘);
/** MySQL database1 password123 */ define(‘DB_PASSWORD1’, ‘linuxscripts123‘);
You need to save the changes made above before exiting.
And you may hit below link to generate salt.
https://api.wordpress.org/secret-key/1.1/salt/
and apply your unique secret key to below section on wp-config.php
define('AUTH_KEY', 'put your unique phrase here');
define('SECURE_AUTH_KEY', 'put your unique phrase here');
define('LOGGED_IN_KEY', 'put your unique phrase here');
define('NONCE_KEY', 'put your unique phrase here');
define('AUTH_SALT', 'put your unique phrase here');
define('SECURE_AUTH_SALT', 'put your unique phrase here');
define('LOGGED_IN_SALT', 'put your unique phrase here');
define('NONCE_SALT', 'put your unique phrase here');
You can change these at any point in time to invalidate all existing cookies. This will force all users to have to log in again.
This brings you to the end of Step 3, and you can now graduate to step 4.
Step Four – Copying the Files
The process of uploading WordPress to the server is almost complete. The final step remains to transfer the unzipped WordPress files onto the website’s root directory by using the following command :
sudo cp -r ~/wordpress/* /var/www/html
From this point onwards, WordPress shall have its own simple and user-friedly online installation form! Well done!
However, the available form would require a specific PHP module for running. Do not lose sweat! If it has not yet been installed on your server, you may download php-gd by using the following command (yes! It is that simple!):
sudo yum install php-gd
You have now successfully downloaded the requisite PHP module, and you may run the form in an unperturbed manner. Last but not the least, you are required to restart Apache by using the following command:
sudo systemctl httpd restart
This brings you to the end of Step 4,and you may now move on the the nest and final step in the process.
Pointing domain name
You can go to godaddy.com , name.com , namecheap.com buy a domain you need to add a A record to your server ip address.
Give it sometime for the dns to resolve your ip on the world.
and you just hit the link http://domain.com/wp-admin/install.php
and you will see the page like below.
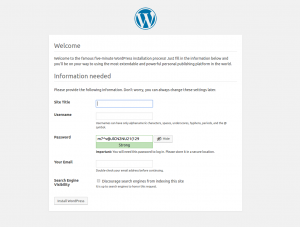
Congratulation, you are officially done create wordpress by your own.
If this article help, just share it to your friends.


Leave a Reply
Want to join the discussion?Feel free to contribute!