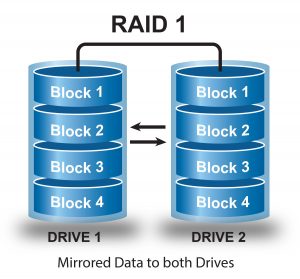
Features of RAID 1 (Mirroring)
- Good read performance, write performance equivalent to a single drive.
- No data is loss when 1 disk fails, as both disk have the same exact data.
- 50% of the space is lost due to both disk will have to store the exact copy of data.
Requirements
- Minimum 2 disks is required to create a RAID 1
- We are using software RAID here, so no physical hardware RAID card is required
This article will guide you through the steps to create a software RAID 1 in CentOS 7 using mdadm. The same instruction should work on other Linux distribution, eg: Redhat, Fedora and etc.
Step 1: Installing the prerequisites and examine the drive.
1. As mentioned earlier, we are using mdadm to create and manage our RAID, so let’s install the package using yum. Some distribution of Linux may have pre-installed this package.
yum install mdadm
2. Examine both of the drive whether is there any existing RAID configurations. This should show No md superblock detected on /dev/sdx.
mdadm -E /dev/sdc
mdadm -E /dev/sdd
Step 2: Partitioning both of the drive for RAID
3. We require a minimum of 2 partition /dev/sdc and /dev/sdd for creating RAID 1. Let’s create partition on the 2 drive with fdisk, and change the type to RAID during partition creation.
fdisk /dev/sdc
Follow the below instruction
- Press ‘n’ for creating a new partition.
- Press ‘P’ to choose primary partition.
- Press ‘1’ to select the partition number as 1.
- Use the default starting sector and ending sector by just pressing 2 times Enter key. This will use the entire drive for this partition.
- Press ‘t’ to change the partition type.
- Press ‘fd’ to choose Linux Raid Auto.
- Press ‘p’ to print the partition table.
- Press ‘w’ to write changes to disk.
Once the /dev/sdc partition is created, follow the same instruction to create a new partition on /dev/sdd drive.
fdisk /dev/sdd
4. Once both the partition is created successfully, you can use lsblk to verify the changes
lsblk
Step 3: Creating RAID1 Devices
5. Next, we’ll create the RAID1 device called /dev/md0, by using the following command
mdadm --create /dev/md0 --level=1 --raid-devices=2 /dev/sdc1 /dev/sdd1
6. Next you can check the status RAID devices using the following commands
mdadm --details /dev/md0
Step 4: Creating File System on the RAID Device
7. Create file system using xfs for /dev/md0 and mount under /raid1
mkfs.xfs /dev/md0
8. Mount the newly create file system under /raid1 and try to create some files.
mkdir /raid1
mount /dev/md0 /raid1
touch /raid1/linuxscriptshub.txt
echo "Linux Scripts Hub RAID Setup"  > /raid1/linuxscriptshub.txt
9. To auto-mount the RAID1 during system startup, you need to add the below line into the bottom of /etc/fstab.
/dev/md0 /raid1 xfs defaults 0 0


Leave a Reply
Want to join the discussion?Feel free to contribute!