
Install Stunnel4 for openvpn connection.
What is Stunnel4?
functionality to existing clients and servers without any changes in the programs’ code. Its architecture is optimized for security, portability, and scalability (including load-balancing), making it suitable for large deployments.
Stunnel uses the OpenSSL library for cryptography, so it supports whatever cryptographic algorithms are compiled into the library. It can benefit from the FIPS 140-2 validation of the OpenSSL FIPS Object Module, as long as the building process meets its Security Policy. A scanned FIPS 140-2 Validation Certificate document is available for download on the NIST web page. The Windows binary installer is compiled with FIPS 140-2 support. The FIPS mode of operation is no longer enabled by default since stunnel 5.00.
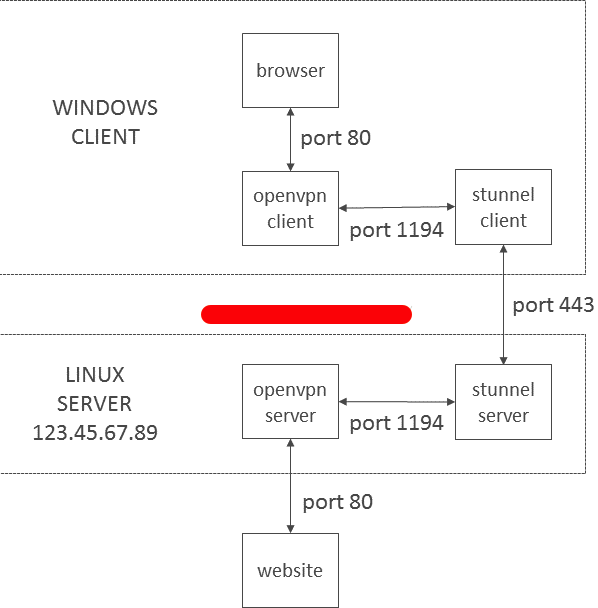
Explanation of the process of Stunnel Between openvpn Connection.
Step1: Install Stunnel4
apt-get install stunnel4
Step2: Create Openssl Key
cd /etc/stunnel/
openssl req -new -newkey rsa:2048 -days 3650
-nodes -x509 -sha256
-subj '/CN=127.0.0.1/O=localhost/C=US'
-keyout /etc/stunnel/stunnel.pem
-out /etc/stunnel/stunnel.pem
Step3: Create Stunnel.conf under /etc/stunnel/
Insert below string into Stunnel.conf
vim /etc/stunnel/stunnel.conf
[openvpn]
client = no #define client #yes or no
accept = 587 #accept which port coming in from stunnel client
connect = vpn.linuxscriptshub.com:1194 #after accept 587 will redirect the port to localhost:1194, which is openvpn port
cert = /etc/stunnel/stunnel.pem #Key that you create in Step2
Save and exit the file.
Step4: Edit /etc/default/stunnel4
vim /etc/default/stunnel4
Find out ENABLED=0
Changes it to 1
ENABLED=1
Step5: Accept port 587 for incoming traffic.
iptables -A INPUT -p tcp --dport 587 -j ACCEPT
Note: if you dont have iptables on ubuntu, please run below command.
apt-get install iptables-persistent
Step6 : Start Stunnel4
service stunnel4 restart / stunnel4 /systemctl start stunnel4
and check port 587 is it listening under stunnel4
netstat -ntulp |grep stunnel
Client Side
Windows
Step1:
Download Windows Stunnel application in here https://www.stunnel.org/downloads.html
Step2: Edit the file stunnel.conf
[openvpn]
client = yes
accept = 127.0.0.1:1194
connect = vpn.linuxscriptshub.com:587
cert = C:Program Files (x86)stunnelconfigstunnel.pem
Step3: Edit your .ovpn file and changes some content.
remote vpn_server_ip
changes to
remote localhost
port 1194
save and exit the file and connect to the vpn.
MacOs
Step1: Using Brew to install stunnel
From a Terminal, run the following command:
brew install stunnel
Step2: Clear the original Stunnel.conf
command: > /usr/local/etc/stunnel/stunnel.conf
Step3: Open that same file up with a text editor, or a program like vi, e.g.
vim /usr/local/etc/stunnel/stunnel.conf
output = stunnel.log
compression = zlib[openvpn]
client = yes
accept = 1194
connect = vpn.linuxscriptshub.com:587
cert = /usr/local/etc/stunnel/stunnel.pem
(This cert can be download from the server, its the key you create using Server Configuration Step2 just now)
Save and exit the file.
Step4: Modify your ovpn file in tunnelblick
remote vpn_server_ip
Changes to
remote localhost
port 1194
and connect it using tunnelblick.


Leave a Reply
Want to join the discussion?Feel free to contribute!